How to make a Universal Mac OS X Leopard Installer USB drive in Windows 10
|
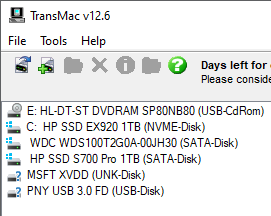
This tutorial used this copy of Leopard, a 16GB PNY USB 3.0 Flash drive, and Windows 10 version 1909. An 8GB drive should work fine, but that is the minimum size I would recommend to try. You will also need to download TransMac. The version used in this tutorial is TransMac 12.6. Note: TransMac costs $59, but a 15 day free trial is also offered and will work well enough for this purpose. Please purchase a license if you intend to use the software beyond the trial. The steps to create a bootable Leopard USB installer are: 1. Plug in your USB drive, and ensure no important files are on it. The drive will be wiped in the following processes. 2. Open TransMac as an Administrator. If you're not sure how, just right click on the program or shortcut, then on "Run as Administrator". In the left column of the TransMac window, there should be a list of all drives currently available on your Windows PC.
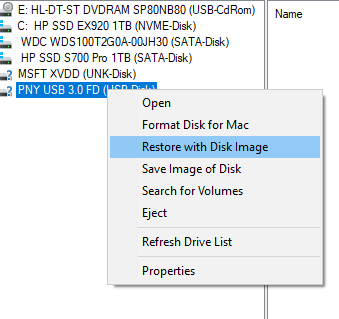
3. Right click on your USB drive, then on "Restore with Disk Image".
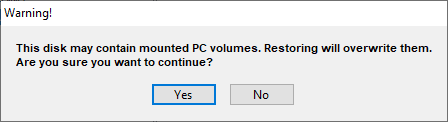
4. If you did not run TransMac as an Administrator, TransMac will now prompt you to do so. There will also be a warning that the drive will be erased. As long as you're okay with the USB drive you're using being erased, click Yes.
5. The next screen will want to know which image file you are going to write to your USB drive. Click the "..." icon to browse your hard drive.
6. By default, TransMac will only look for files that have the extension .dmg. You can change this via a drop down menu in the bottom right corner of this window:
7. The file referenced earlier in this tutorial is a .toast file. So changing to "All Files" is recommended. Locate the Leopard image file on your hard drive using this window. Note: Your filename may be different than the one shown. Double-click on the file or click "Open" to select the file.
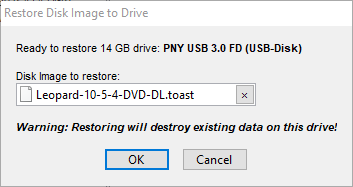
8. You will now be back on the Restore screen. Confirm that the disk image you selected is correct, then press "OK".
9. TransMac will likely now tell you the disk image has not been compressed, and will inform you that it will be written as a raw disk image. Click "OK" to continue. Note: This is the final warning that this USB drive will be erased and overwritten with the Leopard image.
10. TransMac will now copy the image to your USB flash drive. This will likely take several minutes to complete but it does depend on the speed of your PC and choice of flash drive.
11. Once the drive is complete, you will see a message reading "Restore Complete". You may now eject the USB drive (I recommend ejecting the drive in explorer before physical removal) and begin using it in your USB PowerPC (PPC) or Intel Macs!
|
|